
C Sharp Tutorial
The most widely used language for the free, open-source, cross-platform.NET programming environment is C#. This C# tutorial covers the essential foundational concepts of C#.
Introduction to C#
C# is a general-purpose, cross-platform language that increases developer productivity while producing extremely performant code. The widely used .NET language is C#, with millions of developers using it. In our C# tutorial, we go over the following:
- Overview of C#
- Fundamental Concepts of C#
- LINQ
- Asynchronous Programming
Overview of C#
All .NET workloads and the ecosystem as a whole support C#. It integrates numerous aspects of different paradigms, not the least of which is functional programming, and is based on object-oriented ideas.
Without developing dangerous code, low-level features support scenarios with high efficiency. Since C# is used to write the majority of the .NET runtime and libraries, advancements in the language frequently help all .NET developers.
Hello Word with C#
using System;
class Hello
{
static void Main()
{
Console.WriteLine(“Hello, World”);
}
}
Building blocks of Hello World program
using: a directive
System: namespace
Console.WriteLine: It is shorthand for System.Console.WriteLine.
Features of C#
C# has the following features:
- Simple to use and easy to master.
- Huge community support
- Object-oriented programming approach
- Reduced development cost
- Code reusability
- Easily transition from C to C# and vice versa.
Applications of C#
C# can be used for:
- Mobile applications
- Desktop applications
- Web applications
- Web services
- Web sites
- Games
- VR
- Database applications
Fundamental Concepts of C#
In C#, everything is connected to classes and objects, as well as their methods and attributes.
A class is a “blueprint” for building objects, similar to an object constructor.
Creating a Class
Use the class keyword to create a class:
To create a class, use the class keyword:
public class Customer
{
// Fields, properties, methods, etc
}
Create an Object
A class is used to build an object. We can now use the customer class, which we have already built, to create objects.
Customer object1 = new Customer();
Example
class Car
{
string color = “red”;
static void Main(string[] args)
{
Car myObj = new Car();
Console.WriteLine(myObj.color);
}
}
Constructors and Initialization
The fields and attributes of a type are initialized to relevant values when you make an instance of it. Values can be initialized in a few ways:
- Accept default values
- Field initializers
- Constructor parameters
- Object initializers
Each type in.NET has a default value. For numeric types, that value is typically 0; for all reference types, it is null.
public class Container
{
private int _capacity = 10;
}
One way to make callers supply an initial value is to define a constructor that takes care of setting it:
public class Container
{
private int _capacity;
public Container(int capacity) => _capacity = capacity;
}
It is now possible to include a primary constructor in the class declaration:
public class Container(int capacity)
{
private int _capacity = capacity;
}
It is also possible to apply the required modifier to a property and permit callers to set the property’s initial value using an object initializer:
public class Person
{
public required string LastName { get; set; }
public required string FirstName { get; set; }
}
Callers are required to set certain properties as part of a new expression due to the addition of the needed keyword:
var p1 = new Person();
var p2 = new Person() { FirstName = “Grace”, LastName = “Hopper” };
Example
class Car
{
public string model;
public string color;
public int year;
// Create a class constructor with multiple parameters
public Car(string modelName, string modelColor, int modelYear)
{
model = modelName;
color = modelColor;
year = modelYear;
}
static void Main(string[] args)
{
Car Ford = new Car(“Mustang”, “Red”, 1969);
Console.WriteLine(Ford.color + ” ” + Ford.year + ” ” + Ford.model);
}
}
Access Modifiers
Access modifiers, such as the public keyword, are used to control the visibility and level of access to classes, fields, methods, and properties.
These are the access modifiers available in C#:
- public: All classes can access the code.
class Car
{
public string model = “Mustang”;
}
class Program
{
static void Main(string[] args)
{
Car myObj = new Car();
Console.WriteLine(myObj.model);
}
}
- private: You can only access the code within the same class.
class Car
{
private string model = “Mustang”;
static void Main(string[] args)
{
Car myObj = new Car();
Console.WriteLine(myObj.model);
}
}
- protected: The code can be accessed in classes that inherit from it or in classes that are members of the same class. In a subsequent chapter, inheritance will be covered in more detail.
- internal: The code can only be accessed from within the assembly; it cannot be accessed from another assembly. In a later chapter, there will be additional information on this.
Properties and Encapsuation
Property: A property has two methods: a set method and a get method. It functions similarly to a combination of a variable and a method.
class Person
{
private string name; // field
public string Name // property
{
get { return name; } // get method
set { name = value; } // set method
}
}
- name property: An association exists between the name field and the name property. The same name, capitalized for the first letter, should be used for both the property and the private field.
- get: Returning the value of the variable name is the get method.
- set: Value assignment to the name variable is done via the set method.
Example
class Person
{
private string name; // field
public string Name // property
{
get { return name; }
set { name = value; }
}
}
class Program
{
static void Main(string[] args)
{
Person myObj = new Person();
myObj.Name = “Liam”;
Console.WriteLine(myObj.Name);
}
}
Encapsulation: Encapsulation is the process of ensuring that people cannot access “sensitive” data. To do this, you have to:
- declare fields/variables as private
- Then, using properties, give the public get and set methods to access and update the value of a private field.
Why encapsulation?
- Improved member control in the classroom (less chance that you or anybody else will make a coding error)
- Write-only and read-only options are available for fields (assuming you use the set method exclusively).
- Programmers can modify a single section of the code without affecting other sections, making it flexible.
- Enhanced data security
Inheritance
In C#, classes are able to inherit methods and fields from one another. The “inheritance concept” is divided into two groups:
Base Class: This is the class that one is inheriting from (parent).
Derived Class: The class that derives from another class is called a derived class (child).
We should use the “:” symbol to inherit from a class.
Example:
class Vehicle // base class
{
public string brand = “Ford”;
public void honk()
{
Console.WriteLine(“Tuut, tuut!”);
}
}
class Car : Vehicle // derived class
{
public string modelName = “Mustang”;
}
class Program
{
static void Main(string[] args)
{
Car myCar = new Car();
myCar.honk();
Console.WriteLine(myCar.brand + ” ” + myCar.modelName);
}
}
Abstract and virtual methods
- If the base class declares a method as virtual, then a derived class can override it with its own implementation.
- Any non-abstract class that directly inherits from a base class must override any method that the base class designates as abstract.
- A derived class inherits abstract members without having to implement them if it is abstract itself.
- The second main feature of object-oriented programming is polymorphism, which is based on abstract and virtual members.
Interfaces
A reference type that defines a group of members is called an interface.
- That set of members must be implemented by all classes and structs that implement that interface.
- Any or all of these members may have a default implementation defined by an interface.
- Although a class can derive from only one direct base class, it can implement numerous interfaces.
Specific capabilities for classes that don’t always have a “is a” relationship are defined via interfaces.
Example:
System.IEquatable<T>: to determine whether two objects of the same type are equivalent, provided that the type provides equivalency.
The “is a” relationship that exists between a base class and a derived class (e.g., a mammal is an animal) is not implied by IEquatable. Refer to Interfaces for further details.
Polymorphism
“Many forms” is what polymorphism refers to, and it happens when there are numerous classes that are connected to one another through inheritance.
- Consider a base class called Animal, for instance, which contains the animalSound() function. Pigs, cats, dogs, and birds are examples of derived classes of animals.
- They also have their own unique ways of making animal sounds, such as pig oinks and cat meows, among others:
Example
class Animal // Base class (parent)
{
public virtual void animalSound()
{
Console.WriteLine(“The animal makes a sound”);
}
}
class Pig : Animal // Derived class (child)
{
public override void animalSound()
{
Console.WriteLine(“The pig says: wee wee”);
}
}
class Dog : Animal // Derived class (child)
{
public override void animalSound()
{
Console.WriteLine(“The dog says: bow wow”);
}
}
class Program
{
static void Main(string[] args)
{
Animal myAnimal = new Animal(); // Create a Animal object
Animal myPig = new Pig(); // Create a Pig object
Animal myDog = new Dog(); // Create a Dog object
myAnimal.animalSound();
myPig.animalSound();
myDog.animalSound();
}
}
Output
The animal makes a sound
The pig says: wee wee
The dog says: bow wow
Working with Files in C#
We can work with files because of the System.IO namespace’s File class:
using System.IO;
File.SomeFileMethod();
Numerous helpful methods for generating and obtaining information about files are available in the File class.
- AppendText(): Text is added at the conclusion of an already-existing file.
- Copy(): Copies a file
- Create(): Creates or overwrites a file
- Delete(): Delete files
- Exists(): Verifies the existence of the file
- ReadAllText(): To read the content of a file.
- Replace(): Replaces a file’s contents with those of another file
- WriteAllText(): Writes the contents of a newly created file to it. The file will be overwritten if it already exists.
Example:
In the below example, we create a file called “filename.txt” and add some content to it using the WriteAllText() method. We read the contents of the file using the ReadAllText() method:
using System.IO;
string writeText = “Hello World!”;
File.WriteAllText(“filename.txt”, writeText);
string readText = File.ReadAllText(“filename.txt”);
Console.WriteLine(readText);
Output
Hello World!
LINQ (Language – Integrated Query)
Language-Integrated Query (LINQ) is a collection of technologies based on the direct integration of query capability into the C# programming language.
- Traditionally, queries against data are written as plain strings that lack IntelliSense assistance and type verification at compile time.
- Additionally, you must become proficient in a distinct query language for every kind of data source, including SQL databases, XML documents, different Web services, etc.
- Like classes, methods, and events, a query is a first-class language construct in LINQ.
Example
int[] scores = [97, 92, 81, 60];
IEnumerable<int> scoreQuery =
from score in scores
where score > 80
select score;
foreach (var i in scoreQuery)
{
Console.Write(i + ” “);
}
For the code above to compile, you might need to add a using directive, using System.Linq;. Implicit usings are used in the latest iterations of.NET to add this directive as a global using.
How to allow your data source to be queried using LINQ
In-memory data: You may enable in-memory LINQ querying of data in two different ways.
- You query the data using LINQ to Objects if the type of data implements IEnumerable<T>.
- When enumeration cannot be enabled by implementing the IEnumerable<T> interface, you can either construct LINQ standard query operator methods in that type or as methods that are an extension of that type.
- Custom implementations of the standard query operators should return the results via deferred execution.
Remote data: Using the IQueryable<T> interface is the ideal way to enable LINQ querying of a remote data source.
Example
int[] numbers = [ 0, 1, 2, 3, 4, 5, 6 ];
var numQuery =
from num in numbers
where (num % 2) == 0
select num;
foreach (int num in numQuery)
{
Console.Write(“{0,1} “, num);
}
Advantages of LINQ in C#
The three key benefits of LINQ queries over conventional foreach loops are as follows:
- In particular, when filtering several conditions, they are more understandable and simple.
- They require very little application code and offer strong filtering, ordering, and grouping features.
- They require little to no change to be transferred to different data sources.
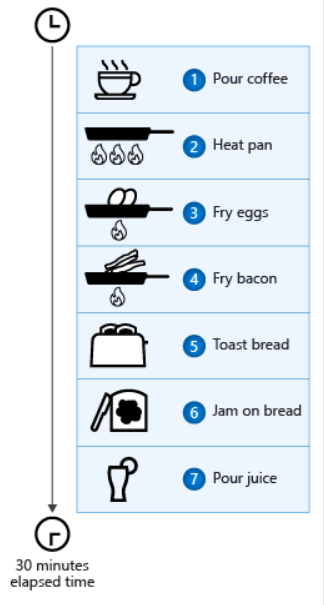
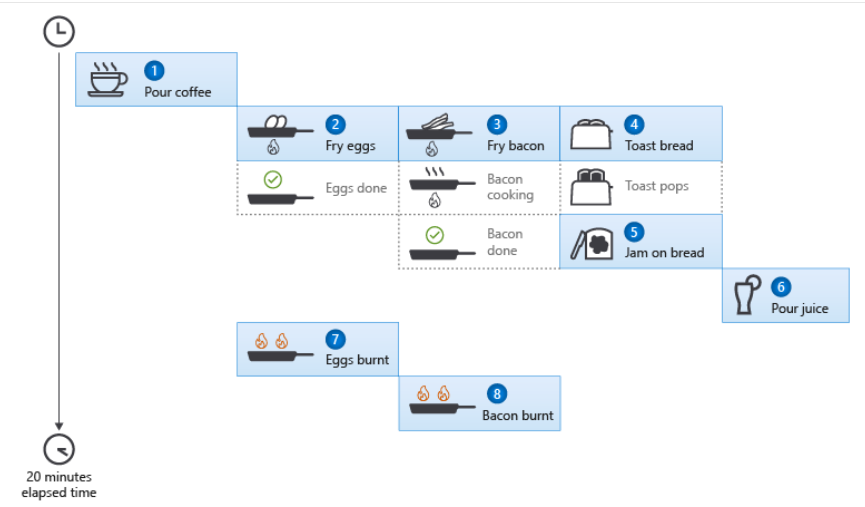
Asynchronous Programming
Over asynchronous code, the Task Asynchronous Programming Model (TAP) offers an abstraction.
- As usual, you write code as a series of statements. That code reads as though each statement finishes before the following one starts.
- Because some of those statements might begin work and return a task that reflects the ongoing work, the compiler has to make a lot of changes.
Example:
using System;
using System.Threading.Tasks;
namespace AsyncBreakfast
{
internal class Bacon { }
internal class Coffee { }
internal class Egg { }
internal class Juice { }
internal class Toast { }
class Program
{
static void Main(string[] args)
{
Coffee cup = PourCoffee();
Console.WriteLine(“coffee is ready”);
Egg eggs = FryEggs(2);
Console.WriteLine(“eggs are ready”);
Bacon bacon = FryBacon(3);
Console.WriteLine(“bacon is ready”);
Toast toast = ToastBread(2);
ApplyButter(toast);
ApplyJam(toast);
Console.WriteLine(“toast is ready”);
Juice oj = PourOJ();
Console.WriteLine(“oj is ready”);
Console.WriteLine(“Breakfast is ready!”);
}
private static Juice PourOJ()
{
Console.WriteLine(“Pouring orange juice”);
return new Juice();
}
private static void ApplyJam(Toast toast) =>
Console.WriteLine(“Putting jam on the toast”);
private static void ApplyButter(Toast toast) =>
Console.WriteLine(“Putting butter on the toast”);
private static Toast ToastBread(int slices)
{
for (int slice = 0; slice < slices; slice++)
{
Console.WriteLine(“Putting a slice of bread in the toaster”);
}
Console.WriteLine(“Start toasting…”);
Task.Delay(3000).Wait();
Console.WriteLine(“Remove toast from toaster”);
return new Toast();
}
private static Bacon FryBacon(int slices)
{
Console.WriteLine($”putting {slices} slices of bacon in the pan”);
Console.WriteLine(“cooking first side of bacon…”);
Task.Delay(3000).Wait();
for (int slice = 0; slice < slices; slice++)
{
Console.WriteLine(“flipping a slice of bacon”);
}
Console.WriteLine(“cooking the second side of bacon…”);
Task.Delay(3000).Wait();
Console.WriteLine(“Put bacon on plate”);
return new Bacon();
}
private static Egg FryEggs(int howMany)
{
Console.WriteLine(“Warming the egg pan…”);
Task.Delay(3000).Wait();
Console.WriteLine($”cracking {howMany} eggs”);
Console.WriteLine(“cooking the eggs …”);
Task.Delay(3000).Wait();
Console.WriteLine(“Put eggs on plate”);
return new Egg();
}
private static Coffee PourCoffee()
{
Console.WriteLine(“Pouring coffee”);
return new Coffee();
}
}
}
Output
Here’s an example of a basic asynchronous implementation of the “make a breakfast” code:
static async Task Main(string[] args)
{
Coffee cup = PourCoffee();
Console.WriteLine(“coffee is ready”);
Egg eggs = await FryEggsAsync(2);
Console.WriteLine(“eggs are ready”);
Bacon bacon = await FryBaconAsync(3);
Console.WriteLine(“bacon is ready”);
Toast toast = await ToastBreadAsync(2);
ApplyButter(toast);
ApplyJam(toast);
Console.WriteLine(“toast is ready”);
Juice oj = PourOJ();
Console.WriteLine(“oj is ready”);
Console.WriteLine(“Breakfast is ready!”);
}
Conclusion
This C# tutorial covers fundamental and important concepts of C# that will help you get started with its basics efficiently. Learn them comprehensively in our C# training in Chennai.