Spring Boot is an open-source Java-based framework designed to simplify the creation of stand-alone, production-grade Spring applications. Learn Spring Boot from scratch with this comprehensive guide, a well-liked framework for rapidly creating Spring-based apps. Explore our Spring Boot course syllabus to kickstart your learning journey.
Spring Boot Basics
Here are the breakdown of Spring Boot key aspects:
What is Spring Boot?
An addition to the Spring framework, Spring Boot makes it easier to set up and create Spring apps. It offers:
- Auto-configuration for most components.
- Embedded servers (Tomcat, Jetty, etc.).
- Features that are ready for production, such as externalized configuration, health checks, and metrics.
Salient Features of Spring Boot
The key features of Spring Boot:
- Auto Configuration: This feature sets up your Spring application automatically according to the dependencies you add. This drastically cuts down on the boilerplate code you have to write.
- Opinionated Starters: To help you get started fast, this resource offers pre-packaged dependencies for popular use cases (such as Spring Web, Spring Data JPA, and Spring Security).
- Embedded Servers: For simple deployment, incorporate servers like Tomcat, Jetty, or Undertow inside your application.
- Command Line Interface (CLI): Provides a robust CLI for managing dependencies, launching apps, and starting new projects.
Learn from anywhere with our Spring Boot online course program.
Benefits of Using Spring Boot
The advantages of using Spring Boot:
- Rapid Development: Reduces boilerplate code and offers a simplified setup to expedite development.
- Simplified Deployment: Construct a single executable JAR or WAR file out of your program.
- Enhanced Productivity: Pay more attention to business logic than infrastructure issues.
- Strong Ecosystem and Community: There is a sizable and vibrant community with a wealth of tutorials, third-party libraries, and documentation.
Key Concepts of Spring Boot
The major concepts of Spring Boot:
- Spring: A feature-rich framework for Java application development that offers aspects-oriented programming, transaction management, and dependency injection.
- Spring MVC: Developed on top of Spring, Spring MVC is a web framework that lets you develop RESTful web services and web apps.
- Spring Data JPA: By offering a higher-level abstraction, JPA (Java Persistence API) streamlines data access.
- Spring Security: It offers extensive security functionalities including authorization and authentication.
Explore our Spring Boot interview questions and answers.
Getting Started with Spring Boot
System Prerequisites:
- Java JDK 8 or higher.
- Maven or Gradle (for dependency management).
- IDE (IntelliJ IDEA, Eclipse, or VS Code).
Create a Spring Boot Project:
- Use Spring Initializr:
- Go to Spring Initializr.
- Fill in the project details:
- Project: Maven or Gradle.
- Language: Java.
- Spring Boot Version: Choose the latest stable version.
- Group: com.example (or your package name).
- Artifact: demo.
- Dependencies: Add Spring Web (for building REST APIs).
- Click Generate to download the project.
Import the Project:
- After downloading the ZIP file, extract it.
- Import it as a Gradle or Maven project into your IDE.
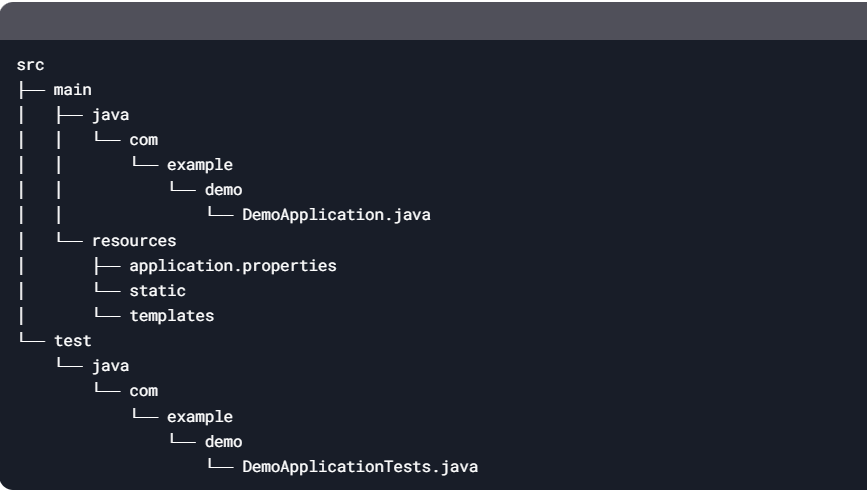
Project Structure
Once completed the project, when you import, it will look as below:

Fine-tune your skills with our Spring Boot Project Ideas.
Create a Simple REST API
Step 1: Create a controller.
The HelloController.java class should be created in the src/main/java/com/example/demo folder:
package com.example.demo;
import org.springframework.web.bind.annotation.GetMapping;
import org.springframework.web.bind.annotation.RestController;
@RestController
public class HelloController {
@GetMapping(“/hello”)
public String sayHello() {
return “Hello, Spring Boot!”;
}
}
Step 2: Run the Application
Open DemoApplication.java (the main class).
Use the command or the “Run” button in your IDE to launch the application:
Bash Command
mvn spring-boot:run
Go to http://localhost:8080/hello in your browser. You ought to observe:
Hello, Spring Boot!
Add Custom Configuration
You can use the application.properties file to personalize your application with Spring Boot.
Example: Change Server Port
Add the following after opening src/main/resources/application.properties:
server.port=8081
Your program will now use port 8081 to operate.
Add a Service Layer
Divide business logic into a service layer in accordance with best practices.
Step 1: Create a Service
The HelloService.java class should be created:
package com.example.demo;
import org.springframework.stereotype.Service;
@Service
public class HelloService {
public String getMessage() {
return “Hello from the Service Layer!”;
}
}
Step 2: Update the Controller
To utilize the service, alter HelloController.java as follows:
package com.example.demo;
import org.springframework.beans.factory.annotation.Autowired;
import org.springframework.web.bind.annotation.GetMapping;
import org.springframework.web.bind.annotation.RestController;
@RestController
public class HelloController {
@Autowired
private HelloService helloService;
@GetMapping(“/hello”)
public String sayHello() {
return helloService.getMessage();
}
}
Check for the complete Java Spring tutorial for beginners here.
Add Database Support (Optional)
Using Spring Data JPA to integrate with databases is made simple by Spring Boot.
Step 1: Add Dependencies
In pom.xml, add:
<dependency>
<groupId>org.springframework.boot</groupId>
<artifactId>spring-boot-starter-data-jpa</artifactId>
</dependency>
<dependency>
<groupId>com.h2database</groupId>
<artifactId>h2</artifactId>
<scope>runtime</scope>
</dependency>
Step 2: Configure the Database
Add the following to application.properties:
spring.datasource.url=jdbc:h2:mem:testdb
spring.datasource.driverClassName=org.h2.Driver
spring.datasource.username=sa
spring.datasource.password=password
spring.jpa.database-platform=org.hibernate.dialect.H2Dialect
spring.h2.console.enabled=true
Step 3: Create an Entity and Repository
Create a User.java entity class:
package com.example.demo;
import jakarta.persistence.Entity;
import jakarta.persistence.GeneratedValue;
import jakarta.persistence.GenerationType;
import jakarta.persistence.Id;
@Entity
public class User {
@Id
@GeneratedValue(strategy = GenerationType.IDENTITY)
private Long id;
private String name;
// Getters and Setters
}
Create a UserRepository.java repository interface:
package com.example.demo;
import org.springframework.data.jpa.repository.JpaRepository;
public interface UserRepository extends JpaRepository<User, Long> {
}
Step 4: Utilize a Service’s Repository
To utilize the repository, update HelloService.java:
package com.example.demo;
import org.springframework.beans.factory.annotation.Autowired;
import org.springframework.stereotype.Service;
import java.util.List;
@Service
public class HelloService {
@Autowired
private UserRepository userRepository;
public String getMessage() {
User user = new User();
user.setName(“Kenneth”);
userRepository.save(user);
List<User> users = userRepository.findAll();
return “Hello, ” + users.get(0).getName() + “!”;
}
}
Explore challenges and solutions for the Spring Boot developers.
Test the Application
Run the program, then go to http://localhost:8081/hello.
Output:
Hello, Kenneth!
Conclusion
The fundamentals of Spring Boot are covered in this tutorial. Now, you can interact with databases, add a service layer, and create REST APIs. Learn Spring Boot from scratch. Have fun with your coding! For more expertise, enroll in our Spring Boot training in Chennai.
