JMeter Tutorial for Software Testing Aspirants
JMeter tests the performance, functionality, and load of web applications. It provides excellent career options for both beginners and professionals. Start your learning journey with our comprehensive JMeter tutorial.
Introduction to JMeter
Apache JMeter is an open-source, Java-based program. It is used to evaluate load, functional behavior, and performance. We cover the following in this JMeter tutorial:
- Overview of JMeter
- Installing and Configuring JMeter
- JMeter Test Plan
- Performance Testing with JMeter
- Advantages of JMeter
Overview of JMeter
Performance testing of various client-server applications, such as websites, web services, databases, FTP servers, etc., can be done with JMeter, a desktop Java application. Apache offers it as an open-source solution that requires no licensing costs. If you are new to application development, try our Java programming course.
Applications that JMeter Websites can test include:
- Websites: HTTP and HTTPS
- Web Services: REST and SOAP
- Database Servers
- FTP Servers
- LDAP Servers
- Mail Servers: SMTP, POP3, IMAP
- Shell scripts and TCP servers
Installing and Configuring JMeter
- The JMeter binary, “apache-jmeter-{version}.zip,” can be downloaded from the Apache JMeter Official Website’s Binaries section.
- To install JMeter, unzip the JMeter binaries into the desired directory.
- Double-clicking the jmeter.bat file located inside the bin folder will now start JMeter.
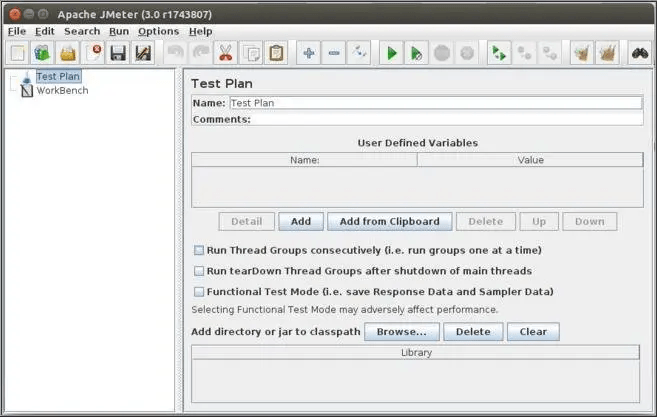
After a successful run, the JMeter GUI shown below will open.
Install JMeter on Linux
- Visit the Binaries section of the Apache JMeter Official Website to get the JMeter binary, “apache-jmeter-{version}.tgz.”
- Extract the binary file to the location where we wish to install JMeter.
- By double-clicking the jmeter.sh file located in the bin directory, we can now start JMeter.
Install JMeter on Mac
- From the Binaries section of the Apache JMeter Official Website, download the necessary JMeter binary, “apache-jmeter-3.0.tgz” or “apache-jmeter-{version}.zip”.
- Extract the binary file to the location where we wish to install JMeter.
- We can now launch JMeter by either running jmeter.sh from the console or by launching the ApacheJMeter.Jar file.
Get started your learning journey with our software testing courses in Chennai.
JMeter Test Plan
A logical container for the many requests or actions needed to construct a performance test script is called a test plan. Different components of the test plan execute the various sorts of operations. adding, deleting, and modifying Test Plan components using the JMeter GUI.
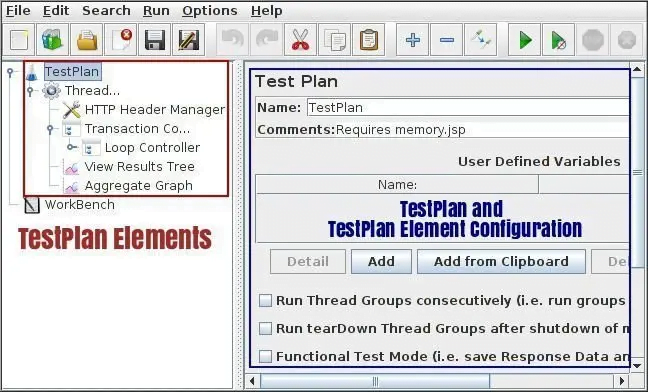
Two panes are visible in the photograph above. While the right pane is used to customize the test plan itself or its many aspects, the left pane is used to add and remove test plan items.
Explore what our Load Runner testing training has in store for your career growth.
Popular Test Elements of JMeter
Thread Groups
In a performance test, virtual users are simulated via thread groups. It is possible to have several thread groups that replicate various user actions within an application.
Properties of Thread Group Control Panel
- Name: This is the Thread Group name, indicating the action carried out by the virtual users. For example, if a Thread Group is programmed to carry out the login process, its name can be “LoginUsers.”
- Comments: Essentially, this is an optional text field where you can write a summary of the action taken by the Thread Group or include any other metadata.
The test for actions carried out in case of any sampler error, because the server does not respond, or because of any assertion error is configured inside the “Action to be taken after a Sampler Error” block.
- Continue: Should there be a sampler mistake, the test ought to go on.
- Start Next Thread Loop: The test proceeds by executing the next thread.
- Stop Thread: In the event of an error, the current thread is stopped.
- Stop Test: This ends the current sampler request and gracefully ends the thread.
- Stop Test Now: In the event of an error, this thread will abruptly stop.
Settings in the block labeled “Thread Properties”:
- Number of threads: The quantity of simulated virtual users is represented by the number of threads or users.
- Ramp-up Period (in seconds): If there are 20 threads and we want each thread to be active in 0.5 seconds, the ramp uptime should be 20*0.5, or 10 seconds. In our upcoming postings, we will examine the advantages of utilizing the Ramp-Up period.
- Loop Count: This is the total number of times a loop iterates over a set of defined operations inside a thread group.
- Loop Count Forever: If this option is selected, the loop will run endlessly unless it is deliberately stopped. It disables or overrides the loop count value.
- Delay Thread Creation Till Needed: This option allows you to postpone creating a thread until the number of seconds you enter in this field.
- Scheduler: for the scheduler configurations are checked, they become active and are taken into account for scheduling tests for a specific time. If not, the test begins running as soon as it is executed.
Configurations in the block labeled “Scheduler Configuration”:
- Duration (seconds): This parameter indicates how long the test will last; once it is reached, the test ends.
- Startup delay (seconds): JMeter will wait for the chosen startup delay when a test script is executed.
- Start Time: Upon running the test, this field is utilized to provide an absolute system time value for the test’s start. It is only taken into account if the “Duration” field above is left empty.
- End Time: Enter an exact system time value in this field to terminate the test. It is only taken into account if the “Duration” field above is left empty.
Sampler
The many requests that we can make to the server under test are known as samplers. JMeter offers us a variety of request samplers, including HTTP, FTP, TCP, JDBC, etc.
Among the most popular samplers in JMeter are:
- HTTP Request: Sending HTTP/HTTPS queries to a server is done via HTTP requests. The most popular sampler for testing Web-based applications is this one.
- JDBC Request: SQL queries can be sent to a database server via a JDBC request.
- SOAP or XML-RPC Request: Sending SOAP requests to a SOAP web service is done using a SOAP/XML-RPC request.
- FTP Request: Sending and receiving files to an FTP server is done via FTP requests.
- Test Action: This unique kind of sampler is used to insert pauses into a test instead of sending a request to the server.
Logic Controller
We can alter how the sampler requests are transmitted to the server by using a logic controller. A typical illustration of a logic controller is a loop controller, which sends requests to the server repeatedly.
Let’s now explore the different logic controllers that JMeter offers:
- Critical Section Controller: It makes sure that only one thread at a time can access this controller’s child elements.
- ForEach Controller: Based on the values of a group of linked variables, the ForEach Controller is used to process requests repeatedly.
- If Controller: If we have a condition that needs to be evaluated as true or false, we can use the If Controller to specify whether the child element inside it will run or not.
- Include Controller: JMeter’s modularity can be achieved via the Include Controller.
- Interleave Controller: In each loop iteration, the Interleave Controller enables us to select and execute one child element from among numerous children.
- Loop Controller: Its control panel specifies the iteration value that can be used to carry out the operations listed as child components in a loop.
- Module Controller: We can reuse a test fragment (such as a sampler) in our script by choosing the module from the Module Controller’s control panel.
- Random Controller: It selects a single child element every iteration, much like a random controller, except it does it at random instead of the Interleave controller.
- Random Order Controller: Each of its child elements is executed in random order, at most once, using the Random Order controller.
Timers
Timers are used to stop the test from running for a predetermined amount of time. We utilize timers to simulate genuine user wait time or think time.
- Constant Timer: It stops the test from running for a predetermined, fixed period of time.
- Uniform Random Timer: This tool is used to pause the running of tests for a predetermined amount of time.
- Constant Throughput Timer: This unique kind of timer is used to establish pauses of varying length while preserving the total throughput, or samples per minute.
- BeanShell Timer: Using BeanShell scripting, the BeanShell timer is utilized to create the delays.
- BSF Timer: BSF scripting is used to create delays with the BSF timer.
- Gaussian Random Timer: Gaussian distribution is used to create delays with the Gaussian random timer.
Assertions
Assertions are employed in various validation processes to verify the accuracy of the response obtained from the server.
- HTML Assertion: The response’s HTML syntax is verified using the HTML assertion.
- Size Assertion: Using a given value in bytes, the size assertion is used to verify the response’s size.
- Compare Assertion: To compare sampler results, use the Compare Assertion.
- BSF Assertion: Using BSF scripting, the sampler result is validated using the BSF.
- Duration Assertion: The purpose of the duration assertion is to confirm that the sampler request is handled within the allotted time frame.
- XML Assertion: The response’s compliance with valid XML syntax is verified using the XML assertion.
Gain a fundamental understanding of software testing with our manual testing course.
Listeners
JMeter listeners are used to save, display, and analyze test results in tabular or graphical formats. Here are the various types of listeners:
- Aggregate Graph: The test results are shown as graphs and tables using the Aggregate Graph listener.
- Assertion Results: For every incorrect sampler response, the assertion result is shown using the assertion results listener.
- Backend Listener: Specifically designed to be customized with BackendListenerClient, the backend listener is a unique kind of asynchronous listener.
- BeanShell Listener: To allow BeanShell scripting in JMeter, utilize the BeanShell listener.
- BSF Listener: To allow BSF scripting in JMeter, use the BeanShell listener.
- Comparison Assertion Visualizer: It is a tool that facilitates the comparison of assertion results through an intuitive user interface.
- Generate Summary Results: Detailed test results are displayed and stored in log files using the Generate Summary Results listener.
Config Elements in JMeter
JMeter’s configuration components are used to alter or customize the sampler queries sent to the server. These components are introduced at the same level as the samplers we wish to modify, or even higher.
Some of the config elements provided in JMeter:
- CSV Data Set Config: This tool reads data from a CSV file, stores it in one or more variables, and then uses the variable(s) in sampler requests.
- HTTP Cache Manager: Test scripts use the HTTP Cache Manager to add web application caching functionality.
- HTTP Cookie Manager: By offering the ability to send and store cookies, the HTTP Cookie Manager is necessary for session handling.
- User-Defined Variables: Throughout the test script, variables with values (key-value pairs) can be created using the User-Defined Variable configuration element.
- Random Variable: Within a range of minimum and maximum values that are given, random numeric values are generated using the random variable configuration element.
- LDAP Extended Request Defaults: LDAP Extended Request samplers are configured by default using the LDAP Extended Request defaults.
- TCP Sampler Config: TCP Sampler’s default parameters are created using the TCP Sampler Config.
- Simple Config Element: Key-value pairs that can be utilized throughout the test script are created using the basic config element.
Preprocessors in JMeter
Before processing, the sampler requests can be altered using the preprocessor components.
Among the preprocessors offered by JMeter:
- BeanShell PreProcessor: Before a sampler request is sent, the BeanShell preprocessor uses BeanShell scripting to carry out various operations.
- HTML Link Parser: This tool is used to get links from HTML responses that are retrieved from servers.
- JDBC Preprocessor: Before processing a sampling request, a few prespecified SQL queries are run via the JDBC Preprocessor.
- User Parameters for RegEx: Using a regular expression, the RegEx user parameters are used to extract HTTP parameters from certain requests.
- User Specifications: Values for user variables used in thread groups are specified via the user parameters.
Post Processors
The test plan components, known as post processors, are employed to carry out certain tasks following the processing of a sampler request. These postprocessors are typically used to retrieve certain values from the sampler request response.
Various Post-Processor Types in JMeter:
- Regular Expression Extractor: This tool is used to store values in a variable and extract values using regular expressions from HTTP responses.
- BeanShell PostProcessor: After processing a sampler request, it is used to carry out various tasks using BeanShell scripting.
- CSS/JQuery Extractor: Using CSS or JQuery expressions, the CSS/JQuery Extractor retrieves values from HTTP responses and stores them in a variable.
- XPath Extractor: This tool is used to retrieve values from an HTTP response by utilizing expressions in CSS or JQuery. The value that is extracted is then saved in a variable.
- Debug PostProcessor: To construct a subSample with the properties of prior sampler requests, JMeter variables, or system properties, utilize the debug PostProcessor function.
Performance Testing of Web Apps with JMeter
Making a performance test plan for web apps requires the following actions:
Step 1: The process of creating a test skeleton that includes a test plan, configured thread groups, and logic controllers.
Step 2: Using an HTTP proxy server, create or record HTTP requests.
Step 3: Including Timers to introduce thought or wait times in between requests.
Step 4: Including listeners to store and process test data.
Step 5: Test a dry run with one or two users.
Step 6: Setting up and running the load test with the necessary amount of users.
Step 7: Executing the test and evaluating the outcomes.
Parameterization in JMeter
The method by which we can run a test plan several times with various data sets is called parameterization.
We shouldn’t hard-code values during testing, such as search phrases and user credentials. We must parameterize the test scripts to do this.
This helps in the development of a load test script that accurately replicates real-world situations in which various users employ various test sets.
If we need to perform a load test on a search engine such as Google, the recording of the search scenario will be the initial action.
We can’t merely playback the script for a hundred users.
Example: To run an effective load test, we ought to model one hundred consumers conducting one hundred distinct searches.
- We can use parameterization to achieve this and to do so, we can have a CSV file with 100 distinct search terms in it.
- We can now dynamically add the search items from the CSV file in place of the static search item that we had recorded in our script.
Correlation
The key component of scripting is correlation. Typically, it entails retrieving dynamic data from calls or requests that have come before and published it to requests that come after.
Another thing to think about while scripting is handling session variables and creating dynamic scripts. Correlation is a concept we have for dealing with these problems.
Let’s look at an example to see why correlation is specifically necessary. Assume that we have captured a situation wherein:
- The user logs in and hits the OK button.
- The home page loads and the user continues to interact.
Upgrade your skills with automation software testing through our Selenium course in Chennai.
Advantages of JMeter
The following are the advantages of JMeter:
- Free of cost: There are no license fees associated with this open-source product.
- Able to load test many application types: This tool is versatile enough to be used for performance testing a wide range of applications, including shell scripts, LDAP, databases, web applications, and web services.
- Platform independence: As it is entirely Java-based, it is cross-platform and cross-platform compatible.
- Record and Playback feature: This feature makes script creation quicker and simpler by offering drag-and-drop functionality in addition to record and playback options.
- Customizable: JMeter’s source code can be altered by developers to meet their unique needs because it is an open-source project.
- Supports distributed load testing: The distributed load testing features allow us to build a master-slave configuration to conduct load tests on several machines.
- Excellent community support: There are many online tutorials and supportive community members. Additionally, it features freely accessible plugins that support several facets of script building and analysis.
Conclusion
Apache JMeter can test performance on static and dynamic resources, as well as Web dynamic applications. We hope that this JMeter tutorial has covered all the basic concepts. Hone your web app testing skills with our JMeter training in Chennai.