Oracle DBA Tutorial
One of the most popular database systems on the job market is Oracle; therefore, being able to do DBA for Oracle could come in handy both for your current position and your future career search. This Oracle DBA tutorial covers everything that beginners need to know.
Introduction to Database and Oracle
Database: An effectively retrieved, updated, and analyzed collection of structured data is called a database (DB).
Oracle DB: The relational database management system is called Oracle DB. To achieve optimal performance, the primary goal is to effectively store, manage, and retrieve information.
Oracle is a multi-user database system designed to promote data concurrency, high performance, and maximum productivity through a variety of software processes.
The following are some of the main features of an Oracle DBA:
- Database administration is the responsibility of a team of experts rather than just one individual.
- It’s the first database ever designed with enterprise grid computing in mind.
- It uses an architecture based on grids.
Oracle DBA Terminologies
It is necessary to comprehend the fundamental terms used in Oracle DBA to study it. Following are a few common terminologies used in Oracle DBA:
Instance: It is a background process and memory structure that are used to get information out of a database.
Process: A running instance is referred to as a process, task, or job.
Oracle Database contains two different kinds of processes.
- Oracle processes
- User processes
To communicate with the database, an operating system command is not required.
Cache buffer: It is a part of the SGA that serves as a buffer to hold the data that is being queried or altered.
To enhance performance, it keeps the most recent or frequently used data in memory. The database is accessible to all user processes that are linked to it.
Shared Pool: It gathers the data that must be distributed to users. For ease of use and speed, caches can be created for SQL statements, stored procedures, and other data.
Redo log buffer: It keeps track of all database modifications. Redo log files are rewritten and run in a circle. They are therefore archived into archive logs to preserve the database’s recoverability for a longer time.
Consequently, in the event of a system failure, the redo log aids in the recovery of an instance. This enhances the database system’s functionality and performance.
Large pool: This is the optional section that provides memory allotments for big processes, including Oracle backups and recovery procedures.
Locks: Locks are used to limit concurrent access to data resources.
Install Oracle Database
You must download the installer from the Oracle website’s download page to install the Oracle database on your PC.
Once the installation files are downloaded in ZIP format, you must extract them onto your computer and place them in a designated folder.
The structure of the Oracle installation file folder post-extraction is depicted in the accompanying image.
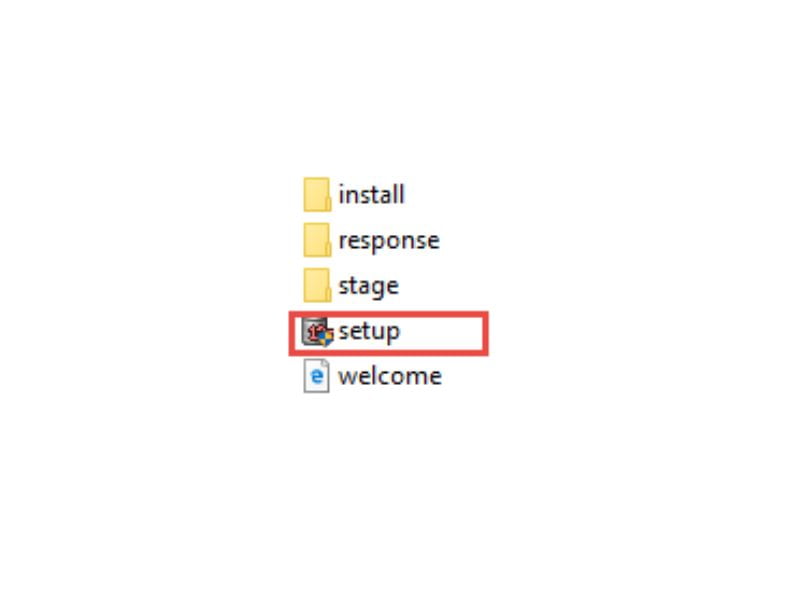
To begin the installation procedure, double-click the setup.exe file at this point. Nine of the steps will work largely on their own.
Step 1: To receive updates and the most recent security issues, the installer requests your email address. You can select the Next button to ignore it:
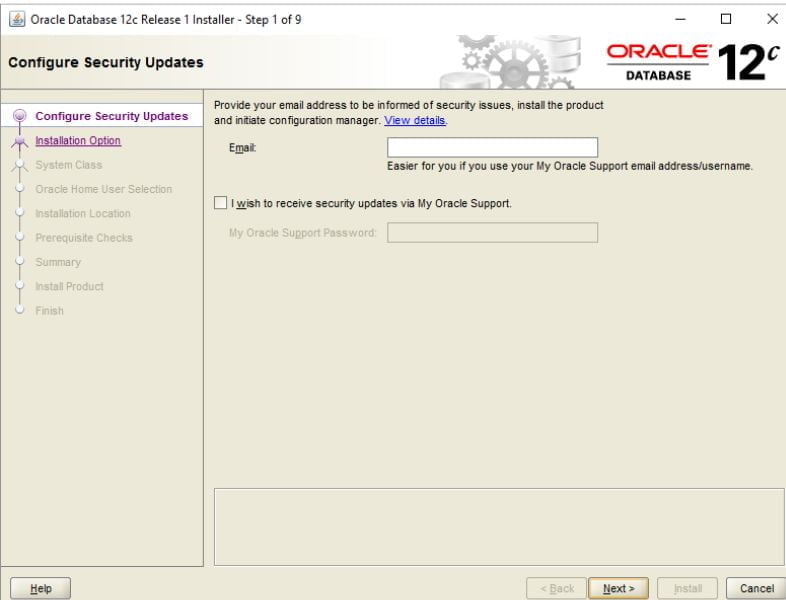
The Oracle database installation verified that we didn’t provide the email address; thus, all you have to do to proceed is click the No button.
Step 2: When installing Oracle software, it will ask you if you wish to upgrade an already-existing database, create and configure a new one, or install database software only. Select option 1 and click Next, as this is the first time you’re installing an Oracle database.
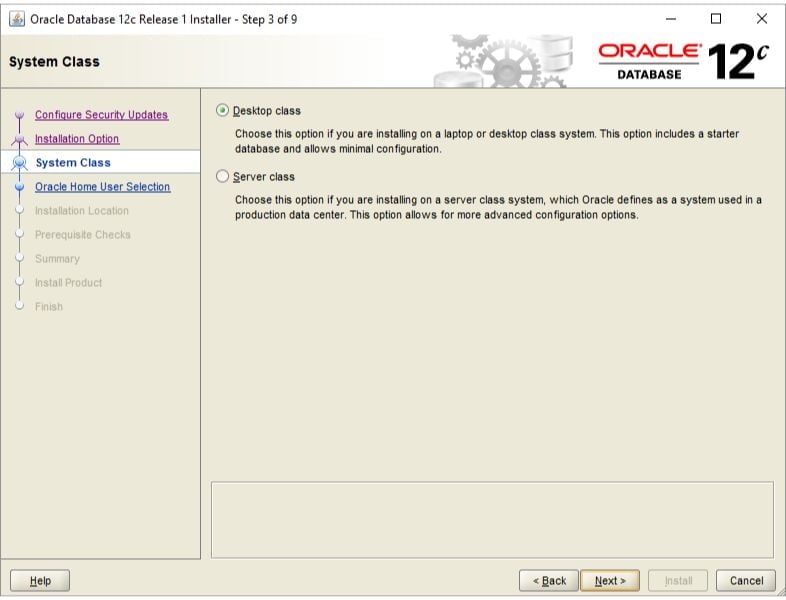
Step 3: The installer has the option to choose the system class. You select the first choice, desktop-class, and press the Next button because you are installing Oracle on your PC and not on a server.
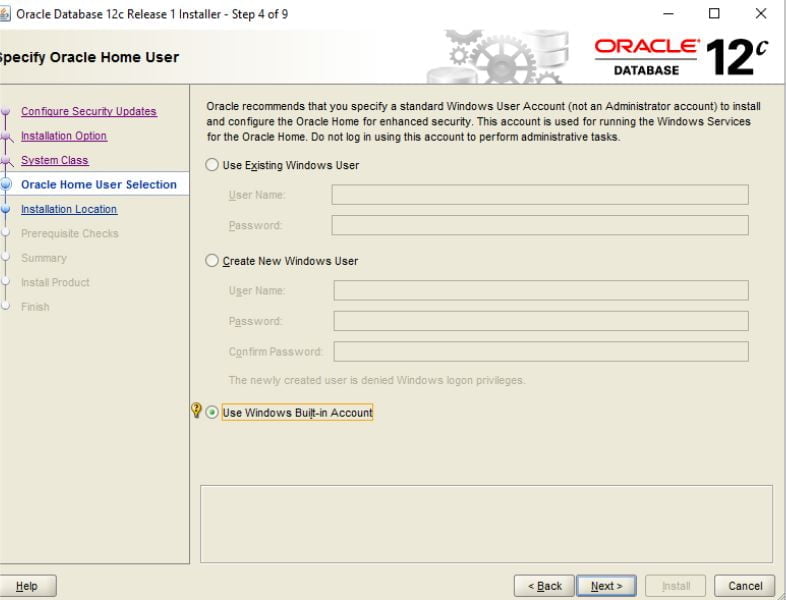
Step 4: To install and configure Oracle Home for improved security, you can provide the Windows user account at this stage. To use a Windows built-in account, select the third option.
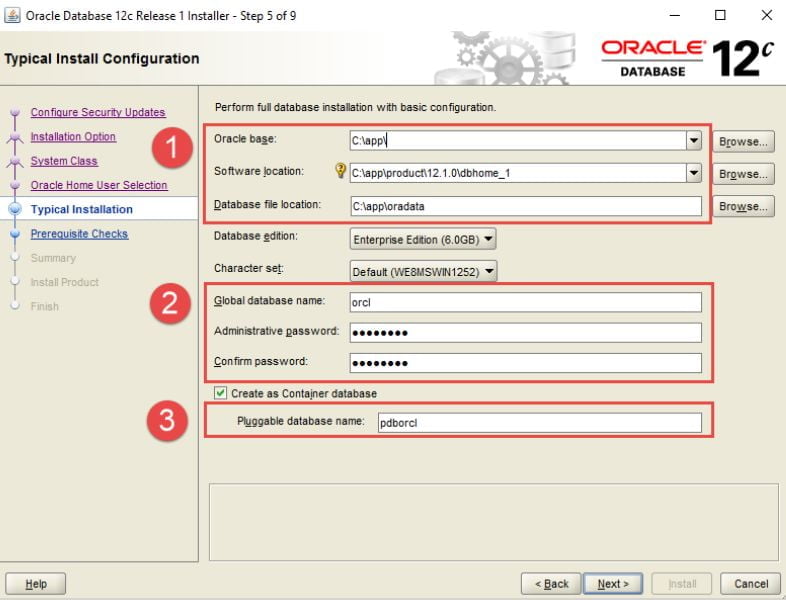
Step 5: This stage allows you to select the pluggable database name, global database name, and password, as well as the location where the Oracle database will be installed.
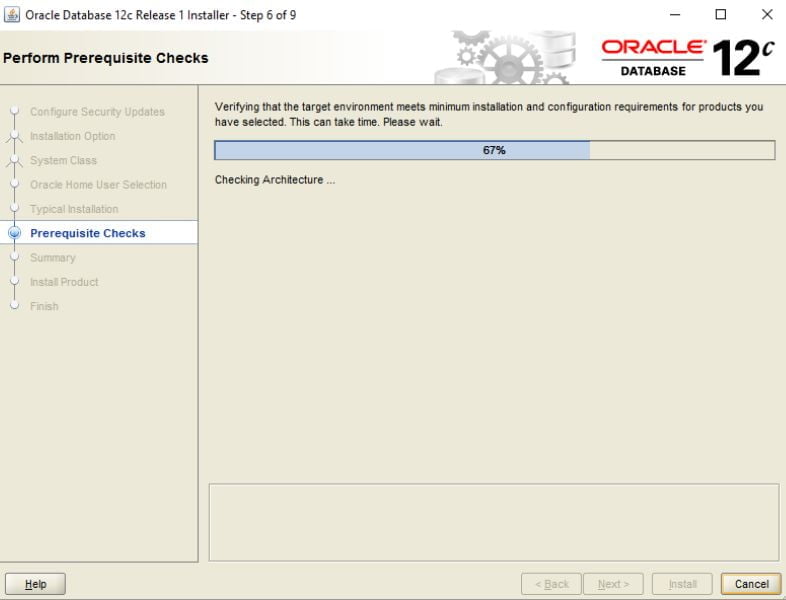
Step 6: It is the installer who checks for prerequisites.
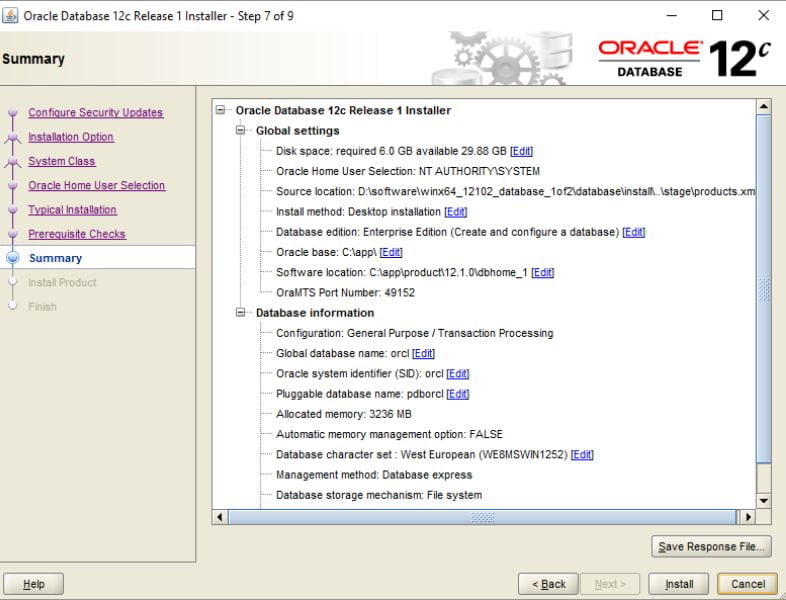
Step 7: You can see an overview of the data, including database details and global settings when you run the installer. After checking that everything is correct, you must click the install button.
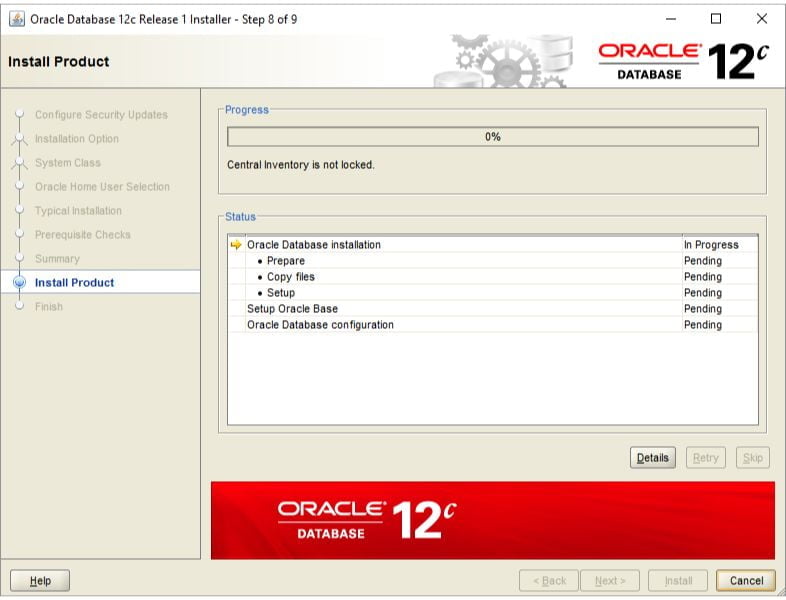
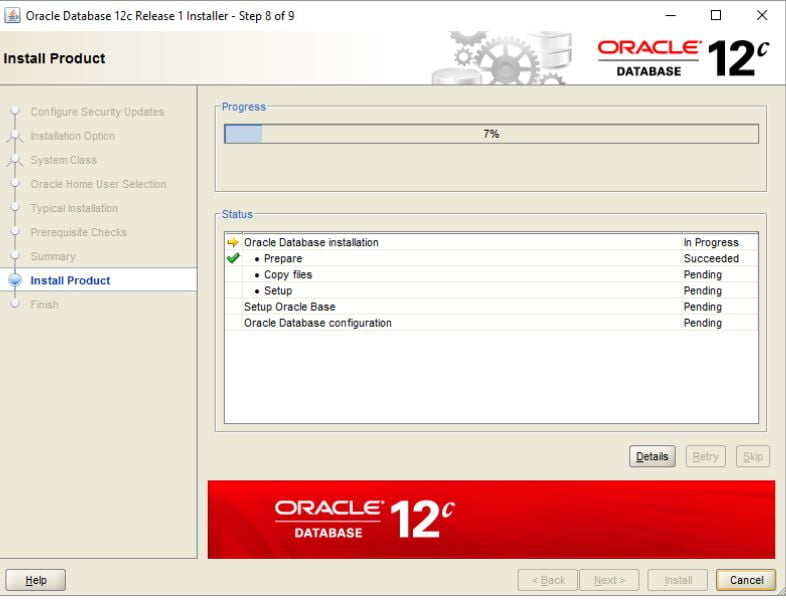
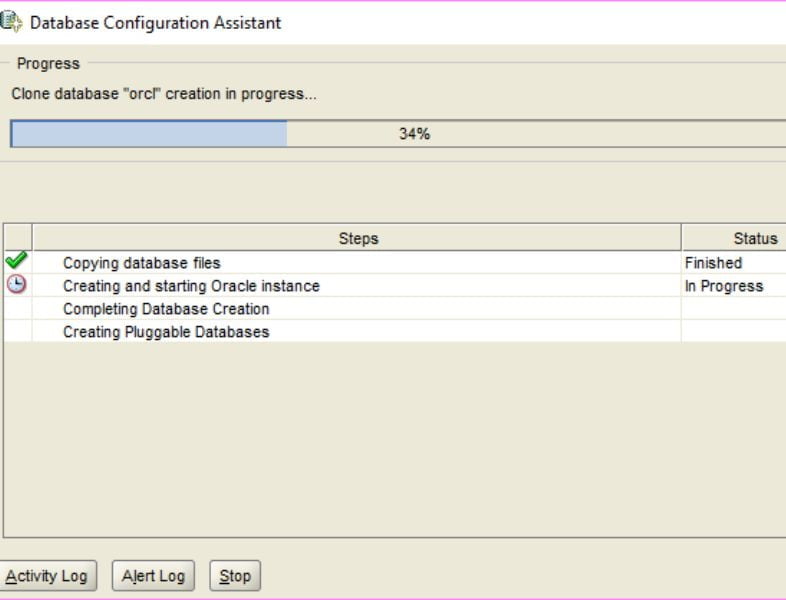
Step 8: The installer is now installing the Oracle database. That will depend on your machine and take a few minutes to finish.
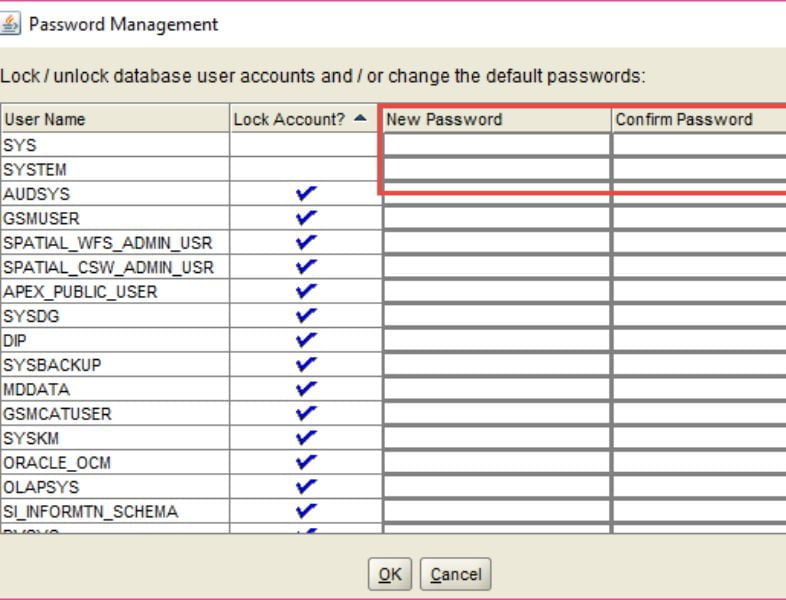
A window called the Database Configuration Assistant will appear. For Oracle database accounts, click the Password Management option to input the password.
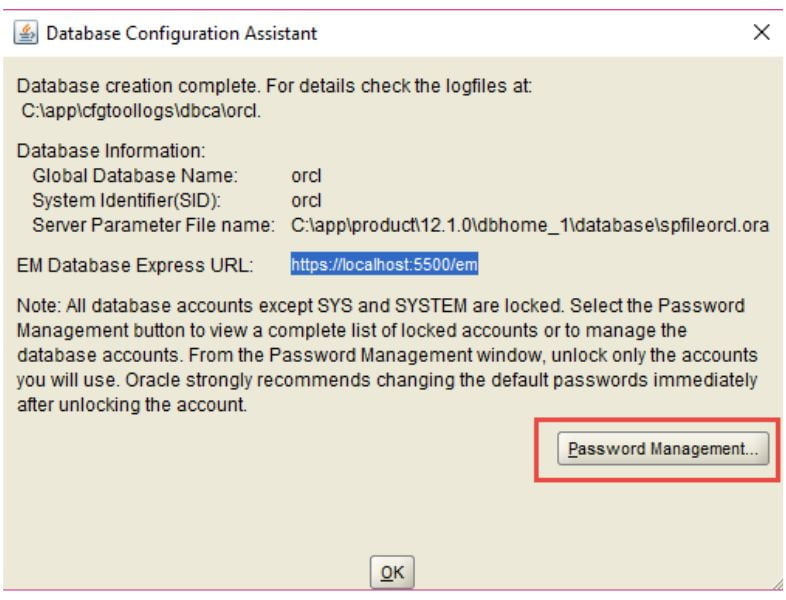
Click the OK button after entering the passwords for the SYS and SYSTEM accounts.
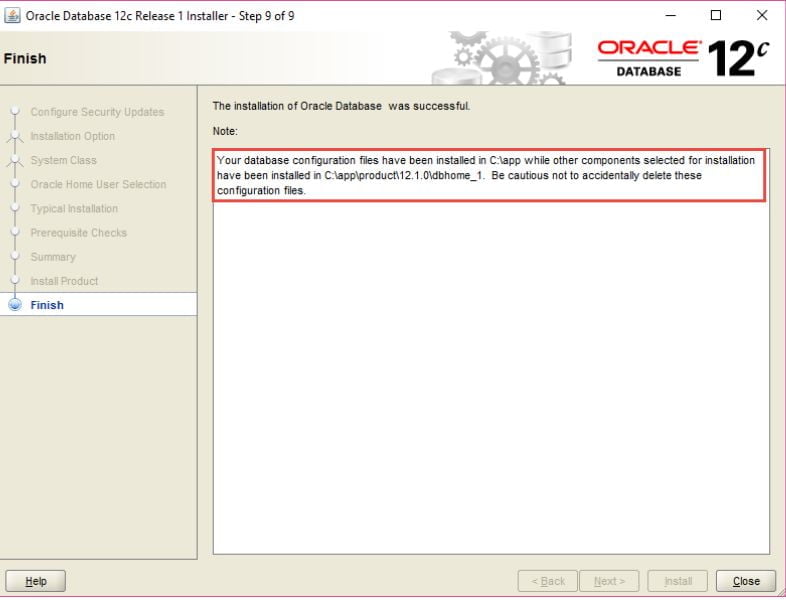
Step 9: The installer will notify you, as seen in the following screenshot, as soon as the installation is successful. To close the window, click the Close button.
Connecting to Oracle Database
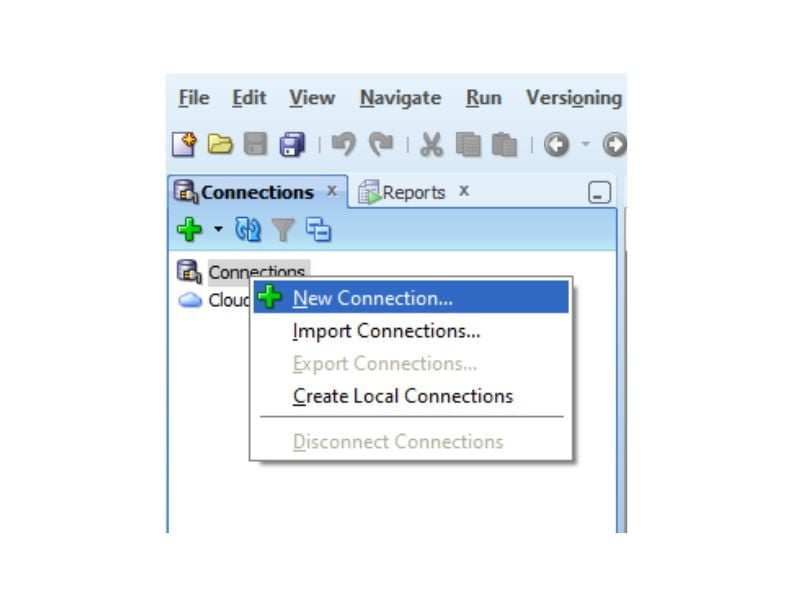
- Start by opening the SQL developer tool that the Oracle Database has provided.
- Secondly, to establish a new connection, right-click the connections node and select the New Connection menu item.
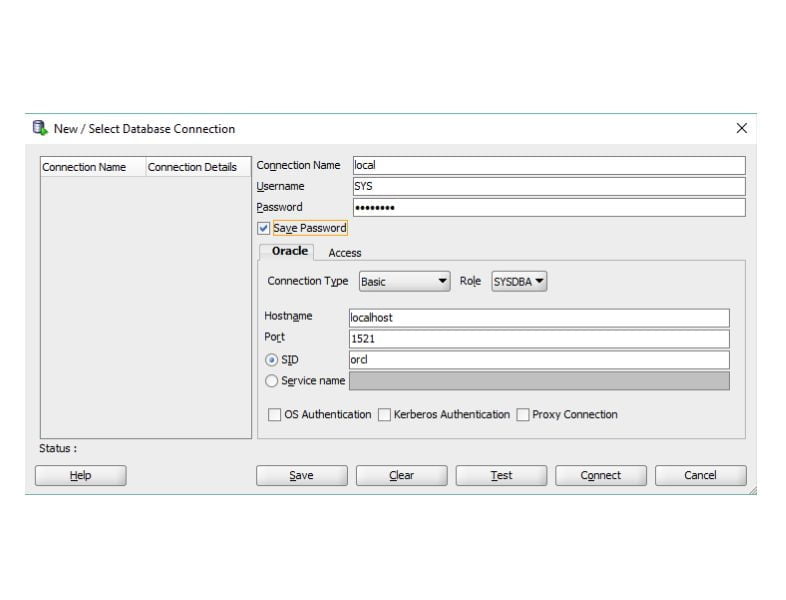
Third, fill in the details as indicated in the screenshot below, which you submitted throughout the installation procedure. To establish a connection to the Oracle Database, click Connect.
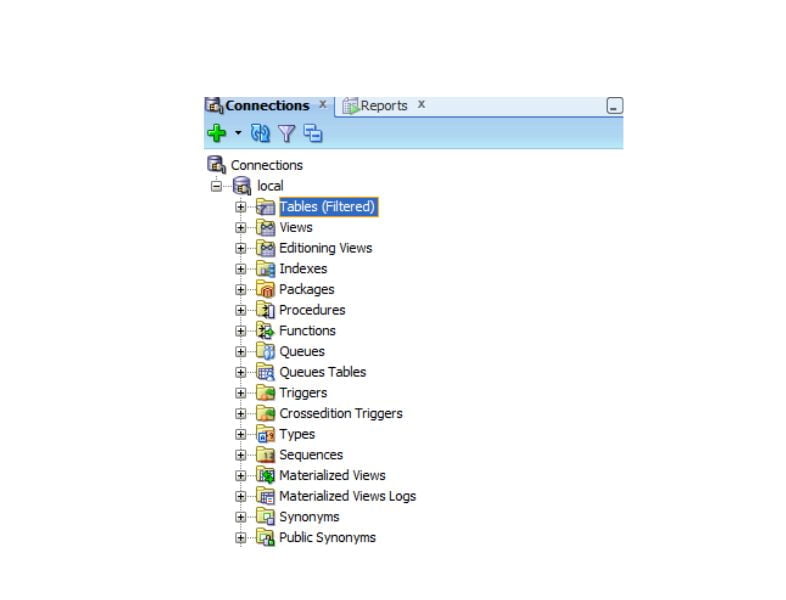
Every object will appear as follows in SQL Developer.
Oracle Database 12c has been successfully installed. Let’s get to know Oracle.
Adding an Entry to the tnsnames.ora file
Usually, the tnsnames.ora file can be found in the following directory:
C:\app\<user>\product\12.1.0\dbhome_1\network\admin\
The file can be found in the following directory if the installation instructions mentioned above are followed:
C:\app\product\12.1.0\dbhome_1\network\admin\
First, open the tnsnames.ora file in Notepad, Notepad++, or any other text editor. Then, after the file, you must add the following lines:
PDBORCL =
(DESCRIPTION =
(ADDRESS = (PROTOCOL = TCP)(HOST = localhost)(PORT = 1521))
(CONNECT_DATA =
(SERVER = DEDICATED)
(SERVICE_NAME = pdborcl)
)
)
You can then close and save the file after that. The example database needs to be downloaded and loaded into the Oracle database server.
Oracle Database Backup, Restore, and Recovery
After that, you can save and close the file. It is necessary to download and load the sample database into the Oracle database server.
These days, there are many different reasons why data loss might occur, which is why creating backups is crucial. The following are a few causes of data loss:
- Data loss or accidental deletion
- Virus attacks
- Hardware malfunctions
- transferring data between systems, and so forth.
In Oracle, there are essentially two methods for backing up data:
Oracle Recovery Manager: RMAN is a robust tool that Oracle offers for database backup and restoration. Database backups can be made incrementally or completely using RMAN.
There is no requirement to install RMAN separately because it is a function of the Oracle Database Server.
User-Managed Backup and Recovery: Oracle allows for user-managed backup and recovery, in which users can use a combination of SQL Plus commands and host operating system commands to execute database backup and recovery.
Backup Strategies
- Oracle Database Configuration Assistant (DBCA) leverages Oracle Enterprise Manager (OEM), an online toolbox that Oracle Corporation employs to manage its hardware and software products, to automate RMAN backup and maintenance routines.
- We create copies and store them on disk and tape with preset retention policies for RMAN backups of databases.
RMAN Configuration for Backups
RMAN is installed in the ORACLE_HOME/bin/ directory along with the Oracle software. To track and manage backups, RMAN either uses the database’s control file or a catalog.
To set up RMAN, a user must be created to serve as the catalog owner. This user must also be granted the RECOVERY_CATALOG_OWNER role and a quota on the tablespace where the schema will be stored.
Enter the following command on the command prompt to launch the RMAN command line:
rman
Next, use the RMAN command line to construct the catalog.
RMAN> connect the target
We will now establish a connection to DBDEV1 (DBID=280973718), the target database that contains the catalog schema.
- The database will be included in the connect catalog string if the catalog is to be stored in another database: RMANCAT (rman/rmanpswd)
RMAN> connect catalog rman/rmanpswd
- The command to generate a recovery catalog is as follows:
RMAN> create the catalog
- The recovery catalog will be generated after we do it. The following must be used to register a database in the recovery catalog:
RMAN> register database
- The database will be listed in the recovery catalog in this manner. We shall then begin the recovery catalog’s complete resync.
RMAN> RESYNC CATALOG;
- The total resync is now finished.
We may begin backing up our databases in Oracle after configuring RMAN. Initially, we will learn how to take RMAN backups with Oracle Enterprise Manager; later, we will learn how to take the same backups using commands.
Backing Up Using Enterprise Manager
Using Oracle Enterprise Manager (OEM), we can quickly create a database backup without the need to develop RMAN scripts.
OEM will use OEM Cloud Control to write the RMAN scripts. We save a great deal of time and money with this because the entire backup process is automated.
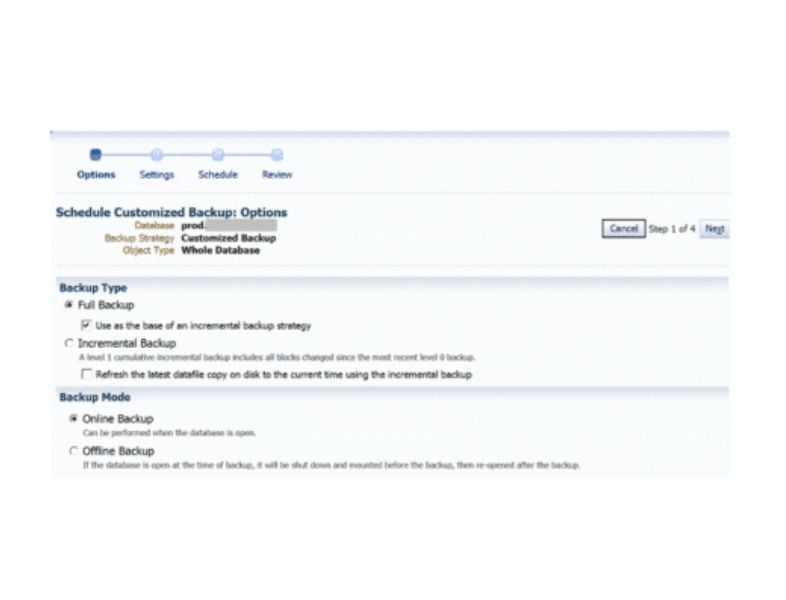
Let’s explore how to back up a database using OEM.
Step 1: From the main page of our database, navigate to Availability, then choose Backup & Recovery, and finally Backup Settings.
Availability → Backup and Recovery → Backup Settings
It will be displayed on the next page. We will begin filling in the fields on the Device tab as indicated below:
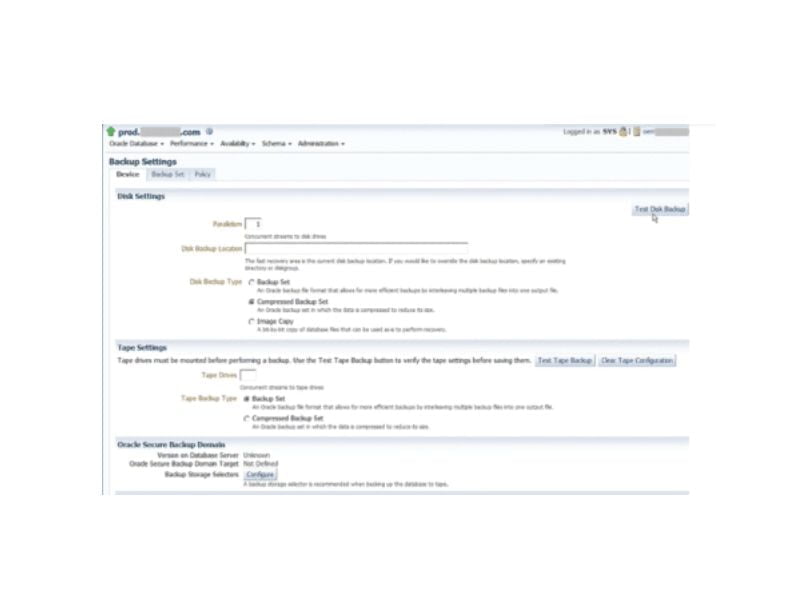
- We will fill in the Disk Settings area if we would like our backups to be created on disk. Parallelism will continue to have its default value of 1.
- We can optimize backup space by maintaining the backup type as a compressed backup set. For this kind of backup, an image copy can also be used.
- All the datafiles will be precisely duplicated, which is helpful for quick recovery. Next, to verify that the disk backup configuration is suitable, we will select Test Disk Backup.
- Similarly, we can populate the Tape Settings box if we want our backups to be made on tape.
Step 2: We will next select the Backup Set tab, as indicated below:
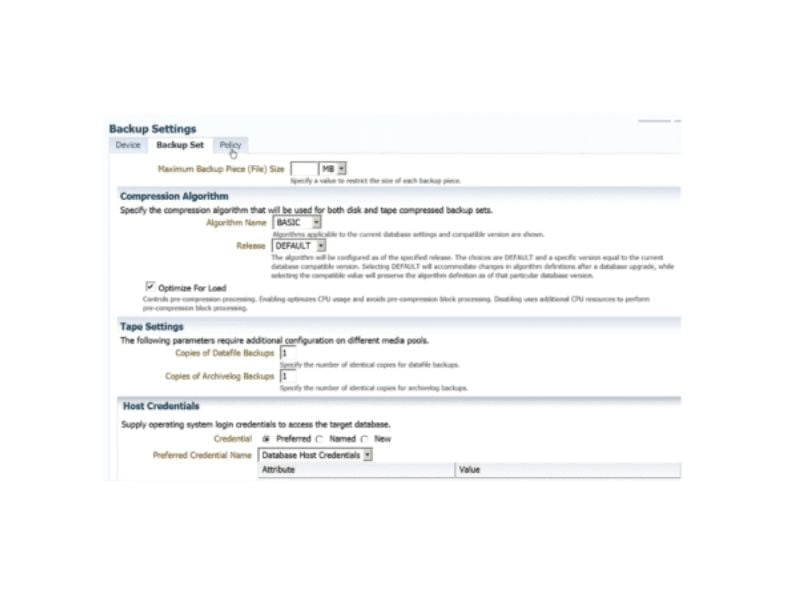
This tab requires us to first set the compression algorithm settings and then specify the maximum backup piece size in MB. One may provide a specific version in the release box or leave it at the default value.
Step 3: We’ll now navigate to the Policy tab, as seen in the screenshot below:
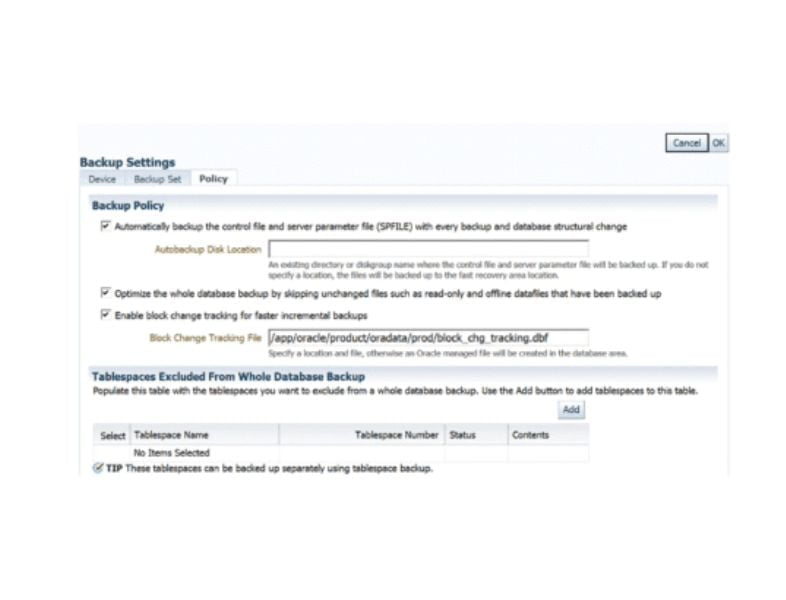
- Here, we will select the option to automatically back up the server parameter file and database control file with each database backup under the Policy tab.
Note: Because the Server Parameter File and Database Control File are crucial files, it is highly advised that you designate the automatic backup.
- The Archived Redo Log Deletion Policy is displayed when you scroll down the Policy tab, as seen in the screenshot below:
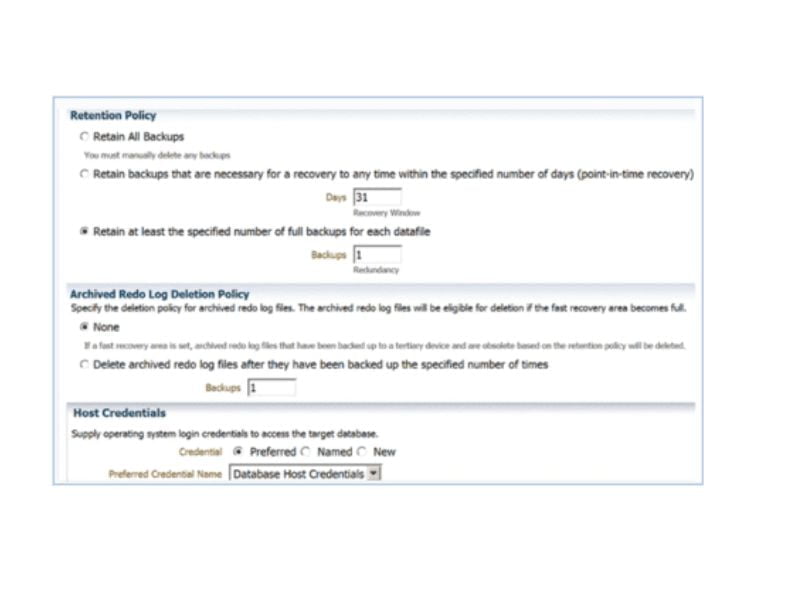
Note: Only one backup will be kept at a time if the default setting of 1 for the number of full backups for each data file is chosen.
This will cause the previous backups to be marked as obsolete whenever a new backup is made. We can use the following command to remove the outdated backups:
DELETE NOPROMPT OBSOLETE DEVICE TYPE DISK;
Lastly, we’ll click OK to store the backup configurations in the database’s control file.
Oracle Commands for Backup and Restore
SQL Server DBAs should recognize the essential commands for backing up and restoring Oracle databases.
First, let’s use the SQL Server command to create a database backup:
backup database customer_db to
disk =’E:\mssql\bkups\customer_db_02022010.bak’
backup log customer_db to
disk=’E:\mssql\bkups\customer_db_log_02022010.trn’
We utilize the Recovery Manager (RMAN) command in Oracle, which looks like this:
RMAN> run {
allocate channel disk1 device type disk;
backup database plus archivelog;
}
With the help of the archive logs, this command will back up the database and write the backup file to the disk.
Backup Options in Oracle
OEM Backup Jobs
RMAN backups can be scheduled as jobs in the database and configured using OEM. The RMAN script will be generated by the OEM and shown to us for confirmation.
This is an excellent method for learning more about RMAN commands and backup alternatives.
Restoring and Recovering Databases
Before delving into the process of restoring and recovering databases, let us first examine the many scenarios in which a database may fail and the reasons why we would need to restore it.
Firmware bugs and hardware malfunctions:
- User errors
- Bad code
- Corrupt blocks
- Upgrade issues
- Bad changes
- Disasters
- Loss of a file, control file, redo log, or data file.
Restore and Recovery Options
The commands recover the database and restore the database apply any modifications found in the archive logs, respectively, and restoring the database restores the database files.
Recovering to a Specific Point
We can choose to restore SQL Server with or without recovery. Using Oracle, all we have to do is restore the database and utilize the recover database command, which offers options for specifying the recovery point.
Furthermore, the database can be restored to a certain archive log, change number, or point in time using the Oracle RMAN recover database command.
Up to a system change number (SCN), we can retrieve. Here is a link to view the current SCN:
v$database view (select current_scn from v$database;)
Archive logs can also be used to recover “until time” or a sequence. We can recover the database up to a pre-upgrade restore point if one has been established for the backup.
Restoring Tablespaces, Datafiles, and Blocks
There is a method to recover the damaged tablespace with downtime for just the apps or users if the database has several tablespaces.
- A backup database and files can be used to restore a tablespace to a point in time before an error or corruption.
- It is not possible to recover the tablespace after a restore, so we should perform a backup beforehand.
- DBVERIFY will report an error and offer information about the datafile and block number if a block of data is faulty.
- The system view v$database_block_corruption will validate the block number. To recover the blocks, we can provide the block number and datafile number using RMAN.
Data Recovery Advisor
- We can utilize the LIST FAILURE and ADVISE FAILURE commands to assist in determining the appropriate course of action if one of the database files is experiencing problems.
- Without causing any data loss, the counselor offers a repair script that makes recovery feasible.
- After executing the advice, the script can be executed with a repair failure. First, the script will be shown to us in the repair failure preview.
Managing Backups
It takes more than just deleting and adhering to the retention policy to manage backups; it also involves understanding which backups are accessible for restores. Oracle offers multiple methods for retrieving backup set information.
Viewing Backups
- To retrieve the backup sets that are in the catalog or control file, use the LIST command in RMAN.
- This would display the various backup components and information, such as the tablespaces that were backed up, the date, the checkpointed SCN, and the full or incremental backup.
- Views into the backup sets are also provided via recovery catalog tables and data dictionary views, which aid in backup management and restoration knowledge.
Oracle Database Maintenance
- Consistency Checks: Consistency checks verify database blocks and search datafiles for corruption. The physical integrity of the data blocks and object rows is examined via consistency tests. Additionally, they can verify that the tables and indexes still have the appropriate data and that the object structures are still intact.
- Health Checks: It checks password policies and DBA and SYSDBA permissions.
- Updating Statistics: Automatic collection of statistics is enabled in Oracle when the STATISTICS_LEVEL parameter is set to TYPICAL or ALL. The GATHER_STATS_JOB job in Oracle Database 10g is designed to collect and maintain outdated statistics.
- System Statistics: The cost-based optimizer uses the statistical data collected to generate query strategies.
sqlplus> exec dbms_stats.gather_system_stats(‘Start’);
— gather for an hour during peak activity
sqlplus> exec dbms_stats_gather_system_stats(‘Stop’);
- Object Statistics: It estimates percentages with the sample size.
- Object Maintenance: In addition to obtaining statistical data on items, certain upkeep and inspections must be performed on them. The objects must be reconstructed because there may be fragmentation.
- Index rebuild
- Table recognition.
- Invalid objects
- Grants
- Synonyms
- Job Scheduling: Manage in OEM or with DBMS_SCHEDULER.
- Creating Jobs in Oracle Scheduler: The following choices are available for Command Type:
- Program name
- PL/SQL (enter the code in the text box)
- Stored procedure
- Executable
- Chain (to link tasks together and build steps)
- Using DBMS_Scheduler:
- File maintenance
- Shrinking and resizing files
- Creating Jobs in Oracle Scheduler: The following choices are available for Command Type:
- Tablespace Monitoring: One or more datafiles are used when creating an Oracle tablespace. Tablespaces and datafiles must be kept up-to-date to accommodate the database’s expansion. Planning the system tablespaces’ size is advised, nevertheless.
- Error Logs, Alert Logs, and Trace Files: Error messages and database status information can be seen in Oracle alert logs. The alert log problems are located on OEM’s first page. The alert log is written to the current log when the instance is restarted, rather than cycling to the next log.
Conclusion
Databases will remain optimized and operate more smoothly if they are regularly maintained and watched for performance problems. This Oracle DBA tutorial covers the basic understanding of database administration with Oracle. Learn more with hands-on exposure in our Oracle training in Chennai.